Tips for photographing Auroras?
Predicting the Aurora Borealis
NOAA (National Oceanic and Atmospheric Administration) Space Weather Prediction Center monitors CME (Coronal Mass Ejections) from the sun and predicts the likelihood of visible auroras. The strength of an aurora is measured by the Kp number (Geomagnetic Activity Level). The higher the Kp number, which ranges from 0 to 9, the stronger the aurora will be. High Kp auroras can be seen farther south and are potentially more active. From above the earth’s pole, the aurora looks like a donut centered on the magnetic pole (not the North Pole). Since most auroras occur 50-80 miles above the earth, they can sometimes be seen farther south than indicated by the “donut” but will be seen closer to the horizon. Kp levels of 5 or higher might provide good viewing near Anchorage but weaker auroras probably require traveling farther north or northeast for good viewing. Keep in mind that predicting the aurora is not an exact science and the aurora is unpredictable. Sometimes on, sometimes not. The web sites listed below may help you determine if a visible aurora is likely. There are also smart phone apps that have information similar to these web sites.
http://www.f5wx.com/#!/page_aurora Gives current aurora status.
http://www.swpc.noaa.gov/products/aurora-3-day-forecast NOAA aurora forecast.
www.gi.alaska.edu University of Alaska Geophysical Institute.
www.softservenews.com Real-time aurora activity and prediction of the Kp level. This site will also provide you an aurora alert via email or text if you sign up for their service.
http://www.asc-csa.gc.ca/eng/astronomy/auroramax/default.asp A Canadian Space Agency project with a real-time, time-lapse camera of the night sky in Yellowknife, Northwest Territories. Also provides a time-lapse video of the previous night’s sky so you can see what you might have missed.
Equipment
· Tripod!
· A wide angle, “fast” lens, such as f/2.8 or wider aperture. My current favorite lens for any night photography is the Sigma Art 20mm f/1.4.
· A camera that can be manually focused using live view. More about focusing under Technique.
· Flash light or head lamp, ideally one that can emit red light. White light ruins your night vision so using red light is helpful.
· Cable or electronic shutter release. (I generally use a 2 second delay rather than a separate shutter release.)
· Lens cleaning cloth. Frost or condensation can form quickly on the lens, especially if you are photographing near open water.
· Warm clothes and hand warmers.
Technique
Focus: Set your camera to manual focus so the camera does not try to auto-focus when the picture is taken. Chose a distant object that is bright enough to manually focus on using live view at maximum enlargement. If there are no natural lights, a bright flashlight lighting a distant object can work. Once the lens is focused at infinity, be careful not to accidently bump the focus. Why not just use the infinity mark on the lens? I have found that this does not always give accurate infinity focus, so I don’t use it. Test your lens to see if you can rely on the infinity mark at all temperatures and at your planned zoom setting if using a zoom lens. Some photographers will focus the lens manually at infinity before it gets dark and then tape the focus ring to the lens barrel. I have not been very successful with this method for some reason.
Exposure: Getting a good exposure is basically trial and error since the brightness of the aurora will vary. In general, shoot with the lens wide open or nearly wide open, with the lowest shutter speed you can use (usually in the 5-30 sec. range) in conjunction with an ISO setting to make a good exposure. Long exposures can be used but the stars may appear as streaks instead of points of light and the aurora will be more blurred. In the dark, the image on your camera LCD will look very bright and may trick you into under exposing the image. Rely on the histogram to judge the exposure.
White Balance: I usually set the camera WB to about 3,500K when photographing the aurora then tweak the color to my liking in post-processing. If you shoot in RAW, any camera WB can be used then adjusted in post-processing without any image quality loss.
Noise Reduction: The main question here is whether to use the in-camera long exposure noise reduction, the one in which the camera makes a “dark frame” exposure following the initial exposure. During the dark frame exposure, no preview image is shown on the LCD and some cameras won’t allow another picture to be taken until the processing is complete. For aurora photography, I usually turn off this function since I want to view the LCD immediately after the image is made. Canon cameras will allow an additional image to be made while a dark image is being processed but neither image will be shown on the LCD until the noise reduction has been completed. For high ISO noise reduction, either the in-camera system or external software such as Lightroom or Nik will give good results.
Know your camera: It’s no fun fumbling around with a camera in the dark with cold hands while a good aurora is happening, so make sure you are fully familiar with the camera.
Composition
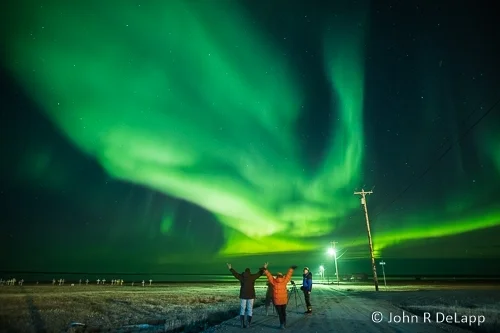
When possible, I prefer to include some landscape elements with the aurora. An aurora reflected in a body of water can make an especially nice image. Most likely, the aurora will be located to the north, northeast, or east, so keep this in mind when selecting a location for your photography. One last note, dark nights are usually best, but a partial moon can help illuminate landscape elements and add interest to the image.